Mobile phones are a very important accessory these days and, having mobile phones without headphones seems incomplete. No one leaves their house without taking their mobile phones and headphones as well. Headphones have become a companion for everyone. People put headphones while driving, exercising, walking, and doing many other things. Headphones really offer a great experience of audio. In fact today there are many headphones which have a built-in mic for the rich audio experience. But what if Airpods mic not working!
Airpods enhance the experience and makes it even more magnified. Airpods mic enhances the communication experience of the users. It helps to establish communication in an easier and feasible way.
But Airpods mic not working can disturb anyone. The issue of the Airpods microphone can be a software issue or any hardware issue. After all, it is a device and issues can be occured. Issues with airports whether it is an apple Airpods or any other Airpods are common and can be fixed.
New users of Airpods experience the problems like their mic only works when they speak directly into it and it is because they do not know where exactly the Airpods mic is. Other reasons for the Airpods mic not working can be improper positioning of the Airpods. Whatever the reason is but Airpods microphone not working is not convenient. The problem can be sorted out just by sitting at home.
To solve the problem of one Airpod not working or even both Airpods not working, the troubleshooting methods require a few moments and Airpods mic not working can be fixed.
Learn how to fix Airpods mic
Follow the below mentioned steps to easily remove the problem of Airpods mic not working:
Method 1 – Locating the Mic on The Airpods

This is actually not a problem. Many users are not sure where exactly the mic of the Airpods should be on Airpods. And you can be among those kinds of users who do not know where your mic should be. The Airpod microphone should be on the bottom end of your device. You will see a silver thin part having the silver grills beneath it. By knowing where the Airpod mic exactly should be, you will know where you will need to speak into.
Method 2 – Proper Positioning Of Airpods
By fix 1, you are now aware where the mic of the Airpods should be. Now, the next thing you have to be sure about is proper positioning of the Airpods. Sometimes, the issues of Airpods mic not working is not due to hardware or software but because of improper positioning of the Airpods. Keeping the Airpods microphone end of the Airpods in the straight down position is a mistake. The right positioning of the Airpods is putting it at an angle pointing towards the mouth. Sometimes, only the repositioning method sort all the issues.
Method 3 – Adjusting Bluetooth Settings

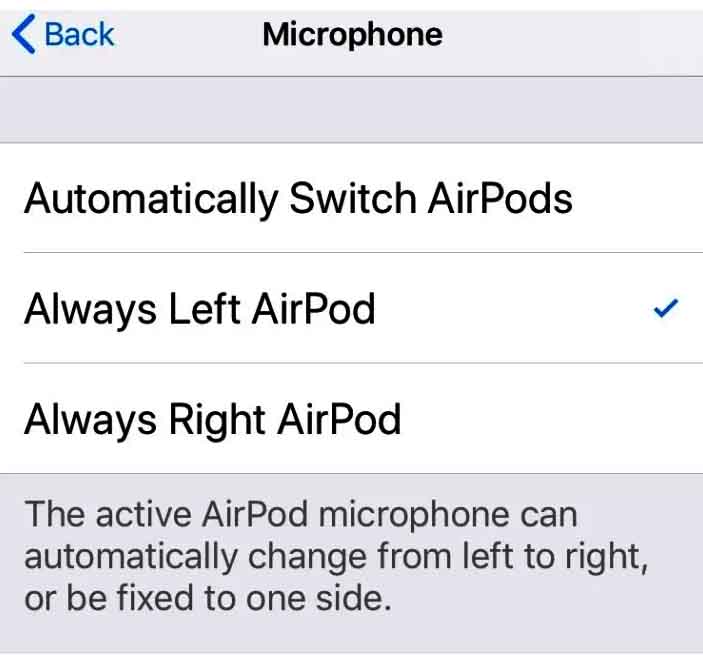
Fixing the problem of left Airpod or the right Airpod by adjusting the Bluetooth settings is not a very conventional solution to this problem. But, there is no doubt that it works for sure. The default setting of the Airpods mic is set to pull the input mic automatically from one Airpod or the other and due to this, a delay occurs by Airpods in deciding which one should pick up.
This issue can be sorted out by changing the settings on your Android or iPhone. The process needs only a few minutes and the issue will disappear. So, follow the simple instructions below:
- Open the Settings app in your phone. It appears with a grey background having an icon of a gear on it.
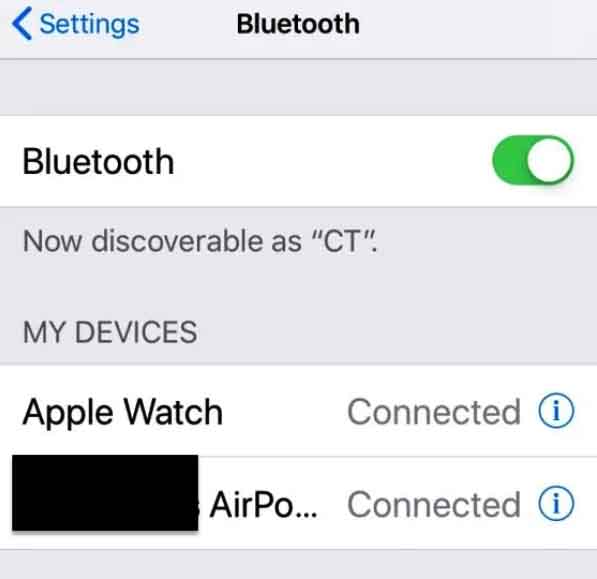
- Then, turn the Bluetooth on.
- It shows my device option, tap on it and tap on Airpods option.
- Then tab on the microphone.
- Then last but not the least select either always Left Airpod or always Right Airpod option on the phone.
After changing the Bluetooth settings, the problem of Airpods microphone will be sorted.
In the article, there are 3 methods to fix the issue of Airpods mic not working are mentioned.
Conclusion
Whether you are using the PC, organizing a zoom meeting or Google meet, using Snapchat or simply having phone calls, Airpods mic not working can create issues. You will require an instant solution to this problem. So, by following the above mentioned fixes, you can solve this problem. In case, if you do not find any solution effective, then you should make a trip to the Apple Store to ask them to fix your problem free of charge if your warranty is still on.
Read Also:
